HOW DO YOU MAKE TIRAMISU ICE CREAM CAKE?
This ice cream cake is not difficult to make but it does require some time to chill in between layers so plan accordingly. The first step is to make the ice cream. This is a simple no-churn ice cream with just 3 ingredients. The ice cream needs at least 4 hours in the freezer to set up and you can make it up to a week in advance.
The other two components in this recipe are pound cake and a chocolate ganache that takes about 3 minutes to make. I used a store bought pound cake in this recipe to make life a little easier.
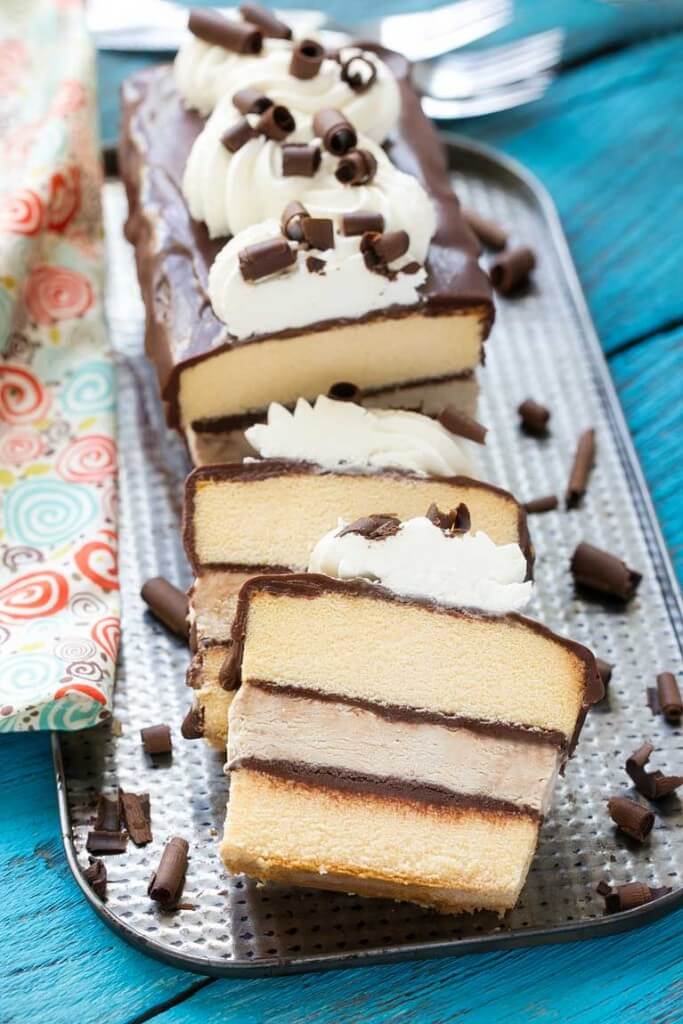
When the ice cream is completely frozen it’s time to assemble the cake. The pound cake gets sliced in half and spread with a layer of ganache, a layer of ice cream, and then a second layer of ganache.
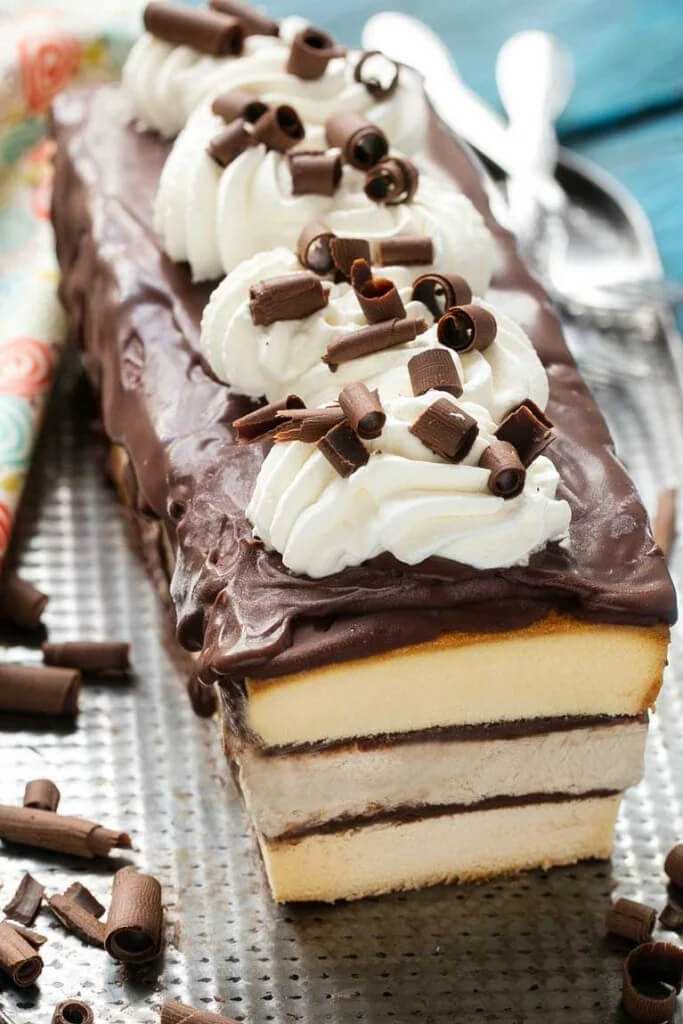
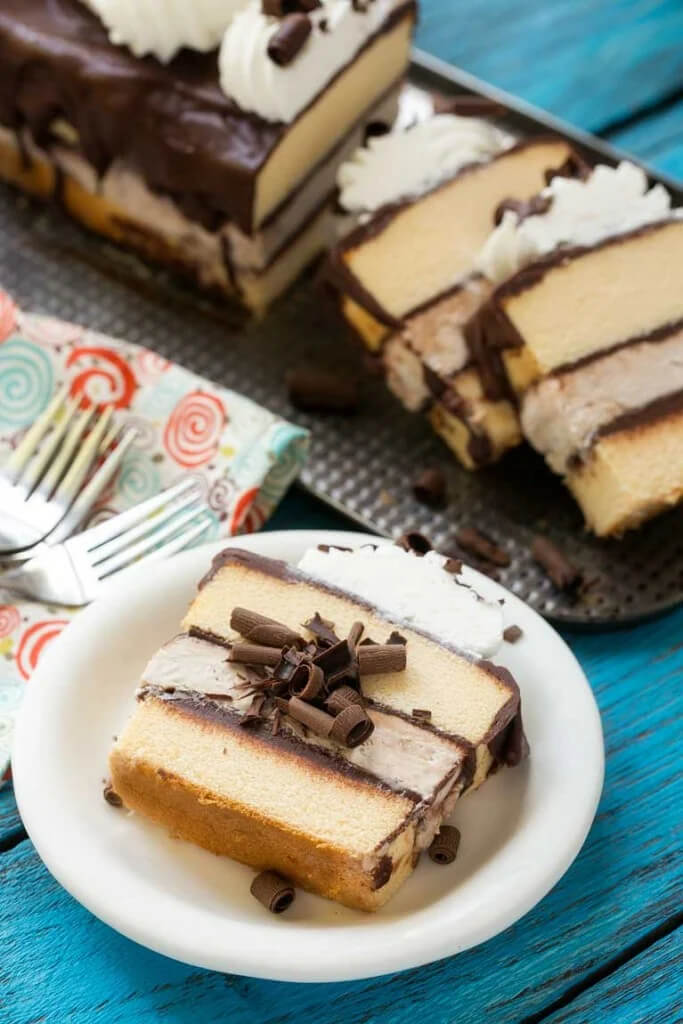
After the cake has been assembled it goes back into the freezer until it’s frozen solid. You can then pull your cake out of the pan and decorate it. I trimmed the sides of the cake to make the pretty layers show through, then I added more chocolate ganache to the top of the cake.
I finished the cake off with some whipped cream and chocolate curls. If you’d like to make your own chocolate curls it’s quite easy to do. You’ll need a bar of chocolate and a vegetable peeler. The trick is that the chocolate needs to be slightly warm – you can hold it in your hand to warm it up. To test if the chocolate is the right temperature to curl, put your finger on it – if a fingerprint is left behind, it’s warm enough that the curls will hold their shape.
This tiramisu ice cream cake is the perfect mixture of flavors and textures and it truly tastes like the classic tiramisu dessert but in frozen form! When you slice the cake it looks really fancy with all of the different layers and everyone will be so impressed that you made your own ice cream.
Recipe Ingredients
For the ice cream
- 1 cup cold heavy cream
- 3/4 cup sweetened condensed milk
- 3/4 cup mocha flavored iced coffee
For the cake
- 16 ounce pound cake homemade or store bought
- 1 1/2 cups semisweet chocolate chips
- 1/4 cup + 2 tablespoons heavy cream
- 1/2 cup cold heavy cream
- 1 tablespoon sugar
- 1 semisweet chocolate bar
Recipe Instructions
- In the bowl of a mixer fitted with a whisk attachment, beat the heavy cream until stiff peaks form, about 3-4 minutes. In another bowl, stir together the iced coffee and condensed milk. Pour the coffee mixture into the whipped cream a little at a time, gently folding it into the whipped cream until all of the coffee mixture has been added.
- Pour the ice cream base into a container and freeze for at least 3 hours, or up to a week.
- Heat the 1/4 cup + 2 tablespoons of heavy cream on the stove or in the microwave until it’s scalding hot – there will be little bubbles and it will be about to boil. Pour the heavy cream over the chocolate chips and stir until the chocolate is completely melted. If the chocolate doesn’t melt all the way in the hot cream you can microwave it for 5 seconds at a time until the mixture is smooth; let the ganache cool for 5 minutes.
- Slice the pound cake in half lengthwise (this is easier to do if it’s cold). Spread 1/3 of the ganache over the bottom layer of cake. Spread the ice cream over the ganache, creating a smooth even layer. You may need to let you ice cream sit at room temperature for a few minutes to reach a spreadable consistency. Place the cake and ice cream layer in the freezer until it’s frozen solid, about an hour. Remove from the freezer and spread with another 1/3 of ganache. Place the second cake layer on top. Freeze for 30 minutes.
- Microwave the remaining ganache for about 10 seconds until it reaches a pourable consistency. Remove the cake from the freezer and pour the remaining ganache over the top, spreading to coat the top evenly. Place the cake back into the freezer until the ganache sets up, about 15-20 minutes. You can serve the cake as is or add the optional garnishes (see below).
For the garnishes:
- Beat the heavy cream with a mixer until stiff peaks form, about 3-4 minutes. Add the sugar and beat for 30 more seconds. Place the whipped cream into a large piping bag fitted with a star tip and pipe a design on top of the cake.
- Warm the chocolate bar in your hands or in a warm spot until your finger leaves a print when you touch the surface of the chocolate. Using a vegetable peeler, shave off chocolate curls. Place the curls on top of the whipped cream.
- The finished cake can be stored, loosely covered in the freezer, for up to 5 days.
NOTES
Make Ahead: The ice cream can be made up to a week in advance. The entire cake can be assembled and stored in the freezer up to 5 days before you’re ready to serve it.
Leave a Reply